
Jumping into slingshot shooting is thrilling—nothing beats the crack of a well-placed shot or the satisfaction of nailing a distant tin can. But beginners often stumble over avoidable pitfalls that hamper progress, compromise safety, and dampen the fun. This guide uncovers the five most common mistakes newcomers make and shows you exactly how to steer clear of them. Along the way, you’ll find real-world insights, expert tips, and practical solutions to build a rock-solid foundation in slingshot mastery.
 1. Choosing the Wrong Frame or Material
“Your slingshot’s frame is its backbone—start with a sturdy one, or risk frustration and inaccuracy.”
The Mistake
Many beginners grab the cheapest Y-shaped wooden frame they can find or pick a flimsy plastic model marketed to kids. While these “toy” slingshots look fun, they often warp, crack, or fail under even modest band tension. Cheap frames introduce wobble at full draw, leading to erratic shots and shattered confidence.
Why It Matters
A subpar frame can:
Bend or Break Under Stress: Low-grade plastic or untreated wood splinters easily when bands exert 30–40 lb of pull.
Reduce Accuracy: Uneven tines cause inconsistent band alignment, so your pouch rubs on one side, pulling shots off-center.
Compromise Safety: A cracked frame can snap mid-draw, sending bands or shards toward your face or hands.
How to Avoid It
Opt for Durable Materials
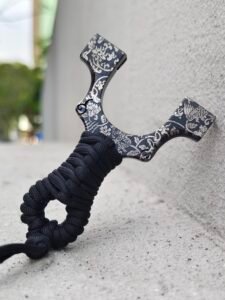
Aluminum Frames (e.g., 7075-T6 aircraft-grade) resist bending and provide a rock-solid platform. Models like the SimpleShot Scout or Hammer XT use machined aluminum that stays rigid even under heavy draw.
Stainless Steel (e.g., SUS 304) offers corrosion resistance and strength. While heavier than aluminum, it’s virtually indestructible if you plan on hunting or practicing in wet conditions.
High-Density Hardwood (e.g., Osage orange, walnut) can be excellent if properly sealed with linseed oil. These woods offer natural shock absorption and a classic feel—but avoid craft-store pine, which is too soft.
Check Machining & Tolerances (for Metal Frames)
Look for frames with ±0.01 mm machining precision so both forks are perfectly parallel. This minimizes band-fork rubbing and ensures consistent pull.
Avoid cast metal or injection-molded plastic; they often have hidden weak points or internal voids.
Assess Comfort & Ergonomics
Hold potential frames in your hand before buying. An ergonomic palm swell with gentle curves prevents fatigue.
Rubber-overmold grips or textured G10 composite handles offer shock absorption and a secure grip—especially important if you shoot in humid or cold weather.
🔧 2. Improper Band Selection, Mounting & Maintenance
“Bands are your powerhouse—pick the right ones and treat them well, or your power fizzles out.”
The Mistake
Beginners frequently:
Use the wrong band type (for example, flimsy toy bands instead of 100 % natural latex).
Pick an improper width/length, resulting in low muzzle velocity or unnatural draw weight.
Attach bands with haphazard knots or weak clips that slip or break mid-draw.
Neglect routine inspection and storage, causing premature band failure.
Why It Matters
Power & Velocity: A quality flatband (e.g., 2040 or 2050) delivers significantly higher initial velocity (FPS) than cheap rubber strips.
Consistency & Accuracy: Uneven band tension or improper anchoring creates unpredictable shot-to-shot variation.
Safety: A blown band can snap back, causing painful welts, or even send fragments flying at high speed.
How to Avoid It
Choose High-Quality Band Brands
Flatbands: Look for TheraBand Black or Jungle Ops 2040/2050 bands. These feature consistent thickness, exceptional elasticity, and thousands of cycles of reliable performance.
Tubular Bands: Brands like NEXTOOL or Stingray Latex offer tubular setups (e.g., 17 mm tubes) that last longer and resist cold-weather brittleness.
Avoid generic “free” bands from toy slingshots—they often lose elasticity after fewer than 200 shots.
Internal Link Opportunity: [Best Slingshot Band Brands Reviewed]
Determine Proper Band Width & Draw Length
Use a band calculator (e.g., 25 % draw-down rule) to size flatbands. For example, if your intended draw length is 10 in, cut a 2040 band (2 in wide, 0.040 in thick) to approximately 7.5 in when relaxed.
Test multiple setups: swapping from a 2040 to a 2050 increases draw weight by ~5–8 lb and yields ~10–15 FPS extra velocity. Find the sweet spot between power and smoothness.
Internal Link Opportunity: [How to Calculate Optimal Band Length & Thickness]
Mount Bands Correctly: OTT vs. TTF
OTT (Over-The-Top): Loop bands over the fork tips. Simple to set up, but band-fork contact can create a slight friction “rub” at release. Ideal for DIY wood frames where drilling is inconvenient.
TTF (Through-The-Fork): Thread bands through precisely machined holes in each tine. This yields a straighter pull path and minimal fork contact—excellent for tight groupings and competitive shooting.
Use high-quality clips (e.g., XT Clips, Hammer XT Clips) or reinforced wrap-and-tuck methods. Avoid basic knots that can slip under tension.
Maintain & Store Bands Properly
Store bands in a cool, dark place (under 78 °F/25 °C) away from UV. Exposure to sunlight rapidly degrades latex.
Lightly dust bands with talcum powder or silicone spray to prevent sticking and moisture absorption.
Inspect bands every 500–1 000 shots—look for tiny cracks or fuzziness. Replace as soon as you notice any wear to avoid catastrophic failure.

🤲 3. Poor Grip, Stance & Anchor Point
“Even the best slingshot in your hand still needs proper technique—master these basics to see real improvement.”
The Mistake
Beginners often:
Clutch the handle too tightly, causing wrist tension and inconsistent aiming.
Stand with unstable posture (feet too close together or shoulders square to target), leading to shaky shots.
Fail to establish a consistent anchor point, resulting in wild shot dispersion.
Why It Matters
Stability & Consistency: An overly tight grip or poor stance induces muscle fatigue and micro-movements, throwing off each shot.
Accuracy: Without a fixed anchor point (cheek, corner of the mouth, or jawline), your eye alignment shifts from shot to shot, causing a large “group size.”
Safety: Jerky or off-balanced draws risk dropping the slingshot or twisting your wrist, possibly leading to accidents.
How to Avoid It
Master the Proper Grip
Hold the handle lightly—imagine you’re holding a raw egg without breaking it. Your thumb should run alongside the handle (not wrapped over the top).
Place your index finger behind the fork junction to provide leverage and stability. Avoid gripping the fork tips.
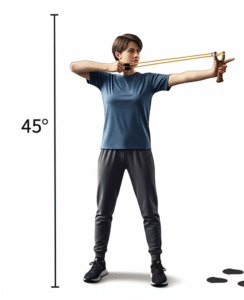
Adopt a Solid Stance
Open Stance: Stand with feet shoulder-width apart, non-dominant foot slightly forward (~3–6 in). This 45° angle to the target maximizes stability.
Squeeze Don’t Clench: Your legs and core should be relaxed but engaged, preventing upper-body sway during the draw.
Common Anchor Locations:
Corner of Mouth: Good for quick, instinctive shooting.
Cheekbone: Favored by precision shooters who aim at distance; aligns naturally with eye.
Jawline: Offers a deeper draw feel—be cautious of pinching the pouch on your teeth!
Anchor point consistency transforms random hits into clustered groups. Aim to feel the pouch touch the same facial spot every time you draw.
Establish & Maintain a Consistent Anchor Point
Drill “Dry-Fire” Practice
What It Is: Drawing and releasing the slingshot without ammo (use protective goggles).
Why It Helps: Builds muscle memory for grip, stance, and release. After 50–100 dry-fires, your natural “sweet spot” for anchor and grip will emerge—leading to immediate improvement when you resume live shooting.
🛡 4. Ignoring Safety Precautions
“Every shot has consequences—neglect safety and you risk injury or damaged property.”
The Mistake
Too many newcomers treat slingshots like harmless toys:
Shooting without a proper backstop, leading to rogue ricochets.
Firing toward hard surfaces (metal, concrete), causing unpredictable bounces.
Skipping eye protection and gloves, exposing themselves to potential harm.
Failing to check local regulations and inadvertently breaking the law.
Why It Matters
Eye & Facial Injuries: A misfired band or ricocheted projectile can easily blind you or cause facial lacerations.
Bypass Ricochets: Steel shot bouncing off a rock or metal target can travel hundreds of feet unpredictably, endangering bystanders.
Legal Consequences: In many jurisdictions, slingshots are classified as weapons. Violating local ordinances can result in fines, confiscation, or worse.
How to Avoid It
Recommended Backstops:
Layered Plywood & Foam: A plywood sheet with a dense foam pad behind absorbs and captures steel shot.
Thick Cardboard & Hay Bales: Cheap, easy to replace. Ensure at least a 2–3 ft thickness of hay for dependable stoppage.
Commercial Slingshot Targets: Professionally rated to catch high-velocity rounds safely.
Always Use a Proper Backstop
Wear ANSI-Rated Eye Protection
Always don polycarbonate safety glasses (ANSI Z87.1-rated or higher). Cheap sunglasses do NOT count—use purpose-built shooting goggles.
Gloves & Skin Protection
Gloves: Thin leather or synthetic shooting gloves prevent rubber burn if a band slips.
Long Pants & Sturdy Footwear: Protect legs and feet from stray projectiles.
Mind Your Surroundings
Check for Bystanders: Always ensure no one is within a 30 yd (27 m) radius of your shooting line.
Avoid Hard Surfaces: Never aim at metal fences, concrete walls, or water; steel shot bouncing off water can travel far.
Respect Private Property: Confirm you have permission to shoot in that location; trespassing can lead to legal trouble.
Know Local Regulations
Research local laws regarding slingshot ownership, age restrictions, and hunting seasons. In many regions, using a slingshot for hunting requires a license or is outright prohibited.
🎯 5. Inconsistent Ammo Selection & Overlooking Projectile Matching
“A high-quality band and perfect aim can still fail if your ammo choice is off—match the right projectile to your slingshot and target.”
The Mistake
Beginners often:
Use random gravel, rocks, or low-quality rubber balls instead of standardized ammo.
Neglect to match ammo size to pouch dimensions, leading to poor control and poor accuracy.
Assume heavier ammo always equals more power, without considering downrange trajectory and kinetic energy.
Why It Matters
Predictability & Accuracy: Uniform ammo (e.g., 6 mm steel shot, 8 mm ceramic balls) produces consistent ballistic performance. Gravel and irregular stones can veer unpredictably on release.
Kinetic Energy (KE) & Lethality: A 6 mm steel shot at 200 FPS (~27 m/s) carries ~0.5 ft-lb of energy—enough for safe plinking. But a 9 mm steel ball at the same velocity delivers ~1 ft-lb, making it suitable for small-game hunting. Misjudging ammo can lead to underpowered (wasted practice) or overpowered (unsafe for beginners) setups.
Pouch Wear & Tear: Oversized ammo strains pouch stitching and can cause premature pouch failure.
How to Avoid It
Start with Standardized Steel Shot
6 mm (0.24 in) Steel Balls: Ideal for beginners—lightweight, inexpensive, consistent, and safe for backyard plinking with a proper backstop.
8 mm (0.31 in) Steel Balls: Offer greater inertia and are better for hunters using a TTF slingshot with 28–32 mm fork width.
Store ammo in a sealed container to prevent rust and contamination.
Internal Link Opportunity: [Best Slingshot Ammo Types for Beginners]
Match Ammo to Pouch Type & Size
Deep Leather Pouches (approx. 2 in wide × 3 in tall) comfortably hold up to 9 mm steel balls without excess movement.
Shallow V-cut Pouches (1.5 in wide) shine with 6 mm ammo, facilitating faster releases and minimizing friction.
Test a handful of rounds: drop them in the pouch—if the ammo jostles excessively, downsize until there’s a snug fit.
Consider Weight vs. Range Trade-Off
Heavier ammo (e.g., clay, ceramic) travels slower at a given FPS but retains energy better at distance, making it suitable for hunting small game (squirrels, rabbits) within 20–25 yd (18–23 m).
Lighter ammo (e.g., plastic BBs, 4.5 mm steel BBs) is best used at <10 yd (9 m) for safe indoor or close-quarters plinking.
Balance Ammo Consistency with Experimentation
Once you’ve mastered 6 mm steel shot, experiment with heavier ammo (7 mm, 8 mm) to see how your slingshot’s FPS, grouping, and trajectory change. Record data:
FPS (using a chronograph)
Group Size (10 shots at 20 yd)
Downrange KE (calculable via zero-velocity FPS and ammo mass)

🎉 Conclusion: Shoot Smarter, Not Harder
By sidestepping these five common beginner mistakes, you’ll accelerate your progress, maximize safety, and unlock the true potential of your slingshot. Remember:
Invest Wisely in a Quality Frame: Choose the right material (aluminum, hardwood, or carbon composite) to ensure rigidity and comfort.
Select & Maintain Bands Properly: Use premium flatbands or tubular latex, mount them with precision, and store them correctly.
Master the Fundamentals of Grip, Stance & Anchor: Light grip, solid stance, and consistent anchor point form the bedrock of accuracy.
Prioritize Safety: Always use a reliable backstop, wear eye protection, and check local laws before shooting.
Match Your Ammo to Your Gear & Purpose: Start with standardized steel shot, scale ammo size to pouch dimensions, and balance weight vs. range.
With these insights in hand, you’ll transform from a novice fumbling with bands into a confident shooter hitting one bull’s-eye after another. Slingshot mastery is not about brute force—it’s about smart gear choices, disciplined technique, and unwavering respect for safety. Go forth, practice thoughtfully, and enjoy every satisfying “thwack” as you level up your slingshot skills!